
How to build an ESK8 Community!
Being based in Chicago I've had the opportunity to ride with the Chicago E-Skate group and not only has it been a lot of fun, it has been a great way to connect with other riders in the community, share resources, and help each other out!
This guide contains examples from ESK8 groups and ambassadors to help you set up a community of your own. We'll be exploring a few topics: creating your page, creating a ride, and running a ride. Not all the advice given in this post will be applicable to every locality. Every city has its own laws & nuances, so keep that in mind and let's get started!
Step 1: Create your page!
One of the easiest ways to start your community is by creating an online forum where people can share information and create group rides. What I recommend, and what most communities have done, is use a Facebook page as the foundation for the group. Make sure to search on Facebook as well, to see if there's a group already around your area!
Telegram
As your community grows you might want to create a group in an instant messaging app such as Telegram. The Chicago E-Skate Telegram is where a lot of the more active users have daily conversation, share content, and help with more direct messaging when meeting for group rides. Joseph G (@joeeskate), Co-leader of Chicago E-Skate and former Boosted Ambassador for Chicago, has found it extremely valuable:
"Create a Telegram group chat so riders can coordinate with each other, meet up, interact in real time, etc. You can make announcements on the group chat as well such as when demo events or group rides are. In our experience it tends to keep everyone constantly engaged & stoked. Our riders are on it literally all the time.”
Community Growth:
To help your community grow, try to reach out to local riders on Instagram or other social media platforms. Let them know about the group and network so that people they might know with boards become aware of the community! Chris M (@yeahthatperson), leader of Pacific NorthWest E-Skate, former Boosted Ambassador, and founder of Derby Days E-Skate Race, gave this advice:
“Just start building and keep going! Set a recurring ride and post everywhere! My first group ride had one person show up… Today we have rides ranging for 20-50 riders! Reach out to esk8 vendors and set up some giveaways to draw a crowd. Don’t be afraid to ask, people want to help!”
Establish Rules and Guidelines
Lastly it is important to establish a standard list of rules and guidelines for the community and your group rides. This creates a level of accountability and expectations for members of the group. Here is the set of rules that Chicago E-Skate has in place for reference:
1. Wear a helmet.
2. Seriously, wear a helmet.
3. Keep a safe following distance.
4. Stagger yourselves while riding.
5. Wear clothing that wont fly off or get caught in wheels.
6. Don't blind people with your flashlight.
7. Watch where you shine your flashlight.
8. Ride responsibly.
9. Be a team player.
10. Communicate.
11. Come prepared.
12. Obey traffic signals.
13. Exercise caution.
14. Ride Defensively.
15. Avoid Road Rage.
16. Keep some form of emergency contact info on your person.
17. Do not ride drunk.
18. No spamming.
19. Be honest with transactions.
I asked Chris M. what the most rewarding part of leading the community was to him:
“Watching the community grow and become self-supporting, seeing the community help each other, and putting on rides & events is the reward! :) I absolutely love my community!”
Step 2: Creating a ride!
Start Location
Now that you have a group page set up, it's time to plan your first ride. To start we will look at how to plan a route. You will want to meet at an easily accessible and neutral location. This is a place where people will be able to gather comfortably and charge their boards. Chicago E-Skate primarily uses 3 types of locations.
- Starbucks – They’re all over the place and you’re able to hangout and charge without being required to purchase anything. Great location as most people will be familiar with it and they should have lots of outlets available.
- Outdoor space - This is a public location usually in a city park or plaza that has outlets available. If weather permitting these spots are great to meet and offer a relaxing atmosphere.
- A local skate shop - Try reaching out to a local skate shop to see if they are willing to host your meet spot. This works especially well if the shop sells electric boards. It helps create a relationship with the shop which could provide benefits, alongside potentially helping them with new customers. Make sure they are comfortable with you charging!
Your Route
Next we’ll take a look at the route itself. The best routes follow smooth pavement where you are the least likely to be affected by car traffic. It's recommended to pick streets with bike lanes and when possible use as many independent bike trails as you can. This will make the riders feel safer and provide a more relaxing ride. Distance will be a factor in the ride as well as you need to consider the range of everyone in the group. The Chicago group rides usually average 5 miles - 6 miles in length before we stop somewhere to recharge.
Your Destination
For your destination you have a couple options. You can either end at another public charging location, or as Chicago E-Skate does, at a bar or restaurant. Stopping at a place with food is great for the riders to bond and connect as their boards charge. You’ll want to call ahead to restaurants and make sure they are willing to accommodate the charging of boards. When calling ahead also make sure to estimate the size of your group and as you go on more rides, you will start to gather a list of bars/restaurants that are friendly with the group. This makes it easier to plan routes as you build relationships with the destinations that are happy to accommodate you!
P.S. a little extra tip for charging never hurts! 😉
Posting the Ride
Once you have your meet location and destination planned, you can map out your route in google maps. You can then get a shareable link so that other people can view the route. Then you'll want to create an event on your Facebook page! This will allow for riders to see the ride information, share the event & route, and mark if they are coming.
Sarah G (@girouxfilms), Co-leader of Chicago E-Skate and former Boosted Ambassador for Chicago shared this about creating the first group rides:
"I remember creating my first couple of rides years ago! I didn't know if anyone would show up, I just posted it on FB and created a route I was comfortable with. I was humbled to see folks show up every time! The interest and eagerness to bond with such a cool new product on the market was apparent from the start."
Now to the logistics for creating the event! First step is timing, you will want to pick a time that works for the members of your group. You can do this by running a FB/Telegram poll or you can use a similar format to Chicago E-Skate. Chicago has a ride on most Tuesday nights that always start at 7:00pm. This gives most people enough time to go home and change after work. Tuesday night is also good because a lot of bars and restaurants are quiet, so they are happy to have the extra business. On the weekends we will do Saturday or Sunday rides usually starting around 11:00am - 1:00pm.
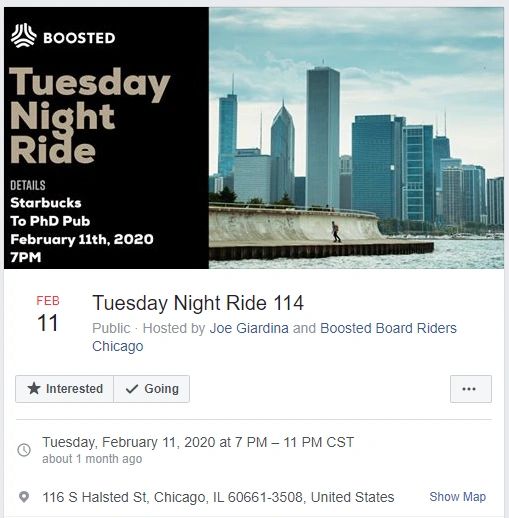
Here's an example of a group ride event post:
"Pick out one day a week or every other if that's not possible & make it your group ride day. Announce it on every medium you have available. It'll start off slowly, maybe no one shows up or just one other rider, but over time if you keep at it, it'll grow. Everyone here loves knowing that at least once a week...most often twice a week...we have a group ride. It's become a staple. Everyone banks on it, tells their friends we always ride this day, you should come, etc.” - Joseph G.
An important note is that depending on your group size, if you make the event starting at 7:00pm, you stay at the start location until 7:15-7:20pm. This provides a window of error for people who might be late or people who rode to the stop and want an extra few minutes to charge.
The event page description is where you can detail the important information about your ride. Here is an example of a description from the group ride event example shared above:
“Tuesday Night Ride 114!
Tuesday, February 11th, at 7PM, I'll be heading from Starbucks (116 S Halsted Street, Chicago, IL 60661) to PhD Pub. We'll order Pizza from Rosati's, charge, and maybe grab something to drink, & then keep on riding.
I'll wait around at Starbucks until 7:15PM & then head out. Anyone who wants to join in is more than welcome.
For Standard Battery Riders, the current route is outside the range of Pro Mode, but Eco or Expert Mode depending on your battery consumption should get you there easily.
There's metered parking for anyone driving on Halsted outside Starbucks.
Lights aren't absolutely necessary for the ride back but are HIGHLY recommended. A decent hand flashlight should suffice. The more lights you have, the better though.
DON'T FORGET TO BRING A HELMET & FLASHLIGHT!
Route Plan:https://goo.gl/maps/Kr5GSpvJ7w2cbynRA (5.0 Miles)”
The above route notes the mileage limitation for Boosted Board riders with a standard range battery. This part might not be a necessary addition for your own group's ride description.
Step 3: How to run a ride!
Now we'll get into advice for being a group ride leader!
What to Bring
Asides from your riding basics like a tool kit, flashlight, charger, and helmet, there are a couple other items that you should consider bringing when hosting a group ride.
- Extension Strip - This is a must have for group rides, especially when they start to grow. This ensures that all riders are able to charge at the meet location/destination. This also makes managing group charging easier if outlets are spread over a distance.
- Portable Charger - Helpful to keep phones and remotes charged up
- First Aid Kit - You want to make sure that in case of an accident, you’re able to help provide the basic supplies needed to clean and bandage a wound.
- Extra Flashlight - Sometimes riders forget or don’t have a flashlight, so it is great to have a backup just in case.
Leading the Ride
Make sure you have your route down! Also don’t forget to take a photo of the whole group beforehand to share on your social media pages! It's also good practice to remind your riders of the destination and directions before heading out. Chris M. gave this advice:
“Know your community and plan accordingly, don't leave people behind! Try to stay away from dangerous areas. Have at least a few people who know the route, have someone sweeping the rear, and if you can, a few blockers for intersections.”
MAKE SURE TO FOLLOW THE RULES OF THE ROAD. Running red lights, riding in the wrong lane of traffic, and other reckless riding will put your riders in danger. Remember that not every rider might be as skilled as you or be as comfortable on the road.
As Chris M. put it, “Herding the cats” is the most difficult part of the ride:
“Keeping everyone together, getting everyone rolling together, and keeping everyone safe… just general crowd management”.
Make sure to call out your turns! If you’re going to take a right turn, call out “Taking a right!” and use hand signals. This helps ensure nobody gets lost and provides communication to the group. Hand signals are a great way to notify riders of turns, stops, and hazards. You should also call/point out large potholes, construction plates, and obstacles as you lead the route so that all riders can slow down or avoid them as necessary.
Remember to be kind, generous and welcoming on your rides. Most riders are happy to spread the stoke and won’t cause issues, but make sure you help set the tone of the community.
“Occasionally you may get that one person that causes issues. However, with a strong and responsible community, it can be addressed as a group.” - Chris M.
Finally as your group grows you might run into a unique problem: blowing breakers!
Chicago E-Skate has certainly been there. One too many boards are plugged in and then suddenly the power cuts out in the restaurant. If this happens at your destination, be kind and respectful to the managers / owners who will have to flip the breaker to get the power back on. You can try to avoid this by spreading out your boards over a couple outlets. You also might need to take shifts charging if you blow the breaker, the last thing you want is for it to happen a second time during your stay. Sports bars and arcade bars are usually more equipped to handle large amounts of power draw. Establishments in older buildings with few TV’s might indicate that their circuits might not be as cut out to charge for a large group. Worst case you might be asked by the establishment to not charge anything anymore or to leave after the breaker pops. If this happens make sure you apologize and treat them with respect. You do not want to give the community a bad name!
Hope this guide provided some helpful information for those looking to start and grow your local E-Skate community! If you have any questions, please feel free to reach out to us and we’d be happy to help. Skate Kastle can also help sponsor your group rides!
- Brandon Levy (@eboardbrandon)

Leave a comment